At Vineyard Blind & Shutter, we’ve helped countless homeowners across Southern California achieve the perfect look for their windows. While we love providing professional installation, we also believe in empowering our customers who enjoy a good DIY project. That’s why we’ve created this definitive guide, sharing our expert tips and tricks to help you succeed. We’ll walk you through every stage of a 2 inch faux wood blinds installation, from the initial prep work to the final, satisfying click of the headrail snapping into place. Our goal is to make the process straightforward and clear, so you can get a result you’re proud of.
Key Takeaways
- Start with accurate prep work: Before you begin, decide between an inside or outside mount and measure your window frame carefully. Taking the time to also clean the frame and mark your bracket spots precisely will prevent common installation headaches.
- Focus on the details during installation: Small steps lead to a professional finish. Always pre-drill pilot holes to avoid splitting the wood and use a level to ensure your brackets are perfectly straight, which helps your blinds operate smoothly.
- Test your work and keep it simple: Once the blinds are mounted, check that they raise, lower, and tilt without any issues. For long-term care, a quick weekly dusting is all you need to keep your faux wood blinds looking brand new.
Gather Your Tools for Faux Wood Blind Installation
Getting organized before you start is the secret to a stress-free installation. Taking a few minutes to gather your tools and parts will make the entire process go smoothly, so you can enjoy your new window coverings sooner. Let’s walk through exactly what you’ll need to have on hand.
The Essentials
Before you reach for your toolbox, open the package containing your new blinds and lay out all the included hardware. Your installation kit should provide all the specific parts required to mount your faux wood blinds. Seeing everything in one place helps you get a clear picture of the project ahead. You'll typically find the mounting brackets, screws, a decorative valance with its clips, and the tilt wand. I always recommend doing a quick inventory to make sure everything on the parts list is accounted for. This simple first step prevents any surprises once you start the project.
What You'll Need
You don’t need a professional workshop for this project, just a few key items. The most important tool is a screwdriver. To make the job much faster and easier on your wrists, I suggest using a cordless screwdriver or a power drill fitted with a 1/4-inch hex head bit. You will also definitely need a sturdy tape measure for double-checking your window measurements and a pencil for marking exactly where your brackets will go. Having these basic tools ready is the best way to ensure your installation is as seamless as possible and gives you a professional-looking result.
Optional (But Helpful!) Tools
If you want to make the installation even more foolproof, a couple of extra tools can make a big difference. A small level is fantastic for ensuring your brackets are perfectly aligned, which is the key to preventing your blinds from hanging crooked. I also highly recommend pre-drilling pilot holes for your screws, especially if you're working with hardwood window frames. This simple step makes driving the screws much easier and keeps the wood from splitting. A small drill bit that’s slightly thinner than your screw is all you need. While you can install your blinds without these items, they really help guarantee a flawless finish.
How to Measure Your Windows for a Perfect Fit
Getting your window measurements right is the most important step for a smooth installation. It’s the difference between blinds that look like they were made for your space and ones that just don’t seem to fit. Taking a few extra minutes here will save you a ton of hassle later. So, grab a steel tape measure (they’re more accurate than the fabric kind!) and let’s get this done. We’ll walk through exactly what you need to do for a perfect, professional-looking result.
Inside vs. Outside Mount: What's the Difference?
First, you need to decide how you want your blinds to hang. An "inside mount" means your blinds will fit neatly inside the window frame, giving you a clean, built-in look. This is a great option if you have attractive window molding you want to show off. An "outside mount" is when the blinds are mounted on the wall or trim above the window opening. This can make your windows appear larger and is a good solution if your window frame isn't deep enough for an inside mount. The choice affects both the look and the measurements, so decide which style you prefer before you start measuring.
A Step-by-Step Guide to Measuring
For an inside mount, you’ll want to measure the width of the window opening at the top, middle, and bottom. Write down the narrowest of the three measurements; this is the one you’ll use. Do the same for the height, measuring on the left, right, and in the center, and use the shortest measurement. When you buy your faux wood blinds, you’ll look for this exact width. The factory makes a small deduction so the blinds fit perfectly without scraping the sides. For an outside mount, simply decide how wide you want the blinds to be (we recommend adding at least three inches to each side for better light control) and measure that width. Then, measure the height from where you’ll mount the headrail to the bottom of the sill.
Pro Tip: Measure Twice, Install Once
I can’t say this enough: always measure your window before you buy the blinds. It’s a simple step, but it’s the most important one. Go back and check your numbers one more time just to be absolutely sure. This little bit of diligence prevents the frustration of receiving blinds that are the wrong size. Remember, a perfect fit is what makes your new window treatments look truly custom. If you’re feeling at all uncertain or have uniquely shaped windows, don’t hesitate to call in the pros. Our mobile services bring our showroom to you in San Diego, Riverside, and Orange County, and we handle all the measuring to guarantee a flawless fit every time.
Prep Your Windows and Mark for Brackets
Before you even think about picking up a drill, a little prep work will make the entire installation process go much smoother. Getting your window ready and marking your bracket spots accurately is the key to a professional-looking finish. Think of it as setting the foundation; if you get this part right, the rest of the installation will feel like a breeze. Taking a few extra minutes here will save you from potential headaches and ensure your new blinds hang perfectly.
Start with a Clean Window Frame
First things first, let’s get that window frame sparkling clean. Grab a cloth or some cleaning wipes and give the entire frame and the surrounding wall a good wipe-down. You’ll want to clear away any dust, cobwebs, or grime that has built up. This isn’t just about keeping things tidy; a clean surface ensures your mounting brackets will sit flush against the frame for a secure fit. Dust and debris can get in the way, preventing the brackets from being installed properly. It’s a simple step, but it makes a noticeable difference and helps you achieve that crisp, clean look you see in our gallery.
Check for Any Obstructions
Next, take a close look at your window for anything that might get in the way of your new blinds. Do you have window cranks, alarm sensors, or thick, decorative molding? These are common obstructions that can interfere with both the installation and the operation of your blinds. If you have prominent molding, for example, you’ll need to be mindful of where you drill. Planning for these obstacles now prevents you from having to backtrack later. If you run into a particularly tricky window situation, remember our mobile services team is always here to help homeowners across San Diego, Riverside, and Orange County.
Measure and Mark Where Your Brackets Will Go
Accurate measurements are everything. With your blinds handy, it’s time to mark exactly where your brackets will go. A good rule of thumb is to measure about two inches in from each side of the window opening. Use a pencil to make a small, clear mark at each spot. This placement ensures the headrail is well-supported and the blinds operate smoothly. Once you’ve made your marks, you can drill small pilot holes for the screws. This simple preparation makes it much easier to drive the screws in straight and prevents the wood from splitting, giving your faux wood blinds a sturdy and secure mount.
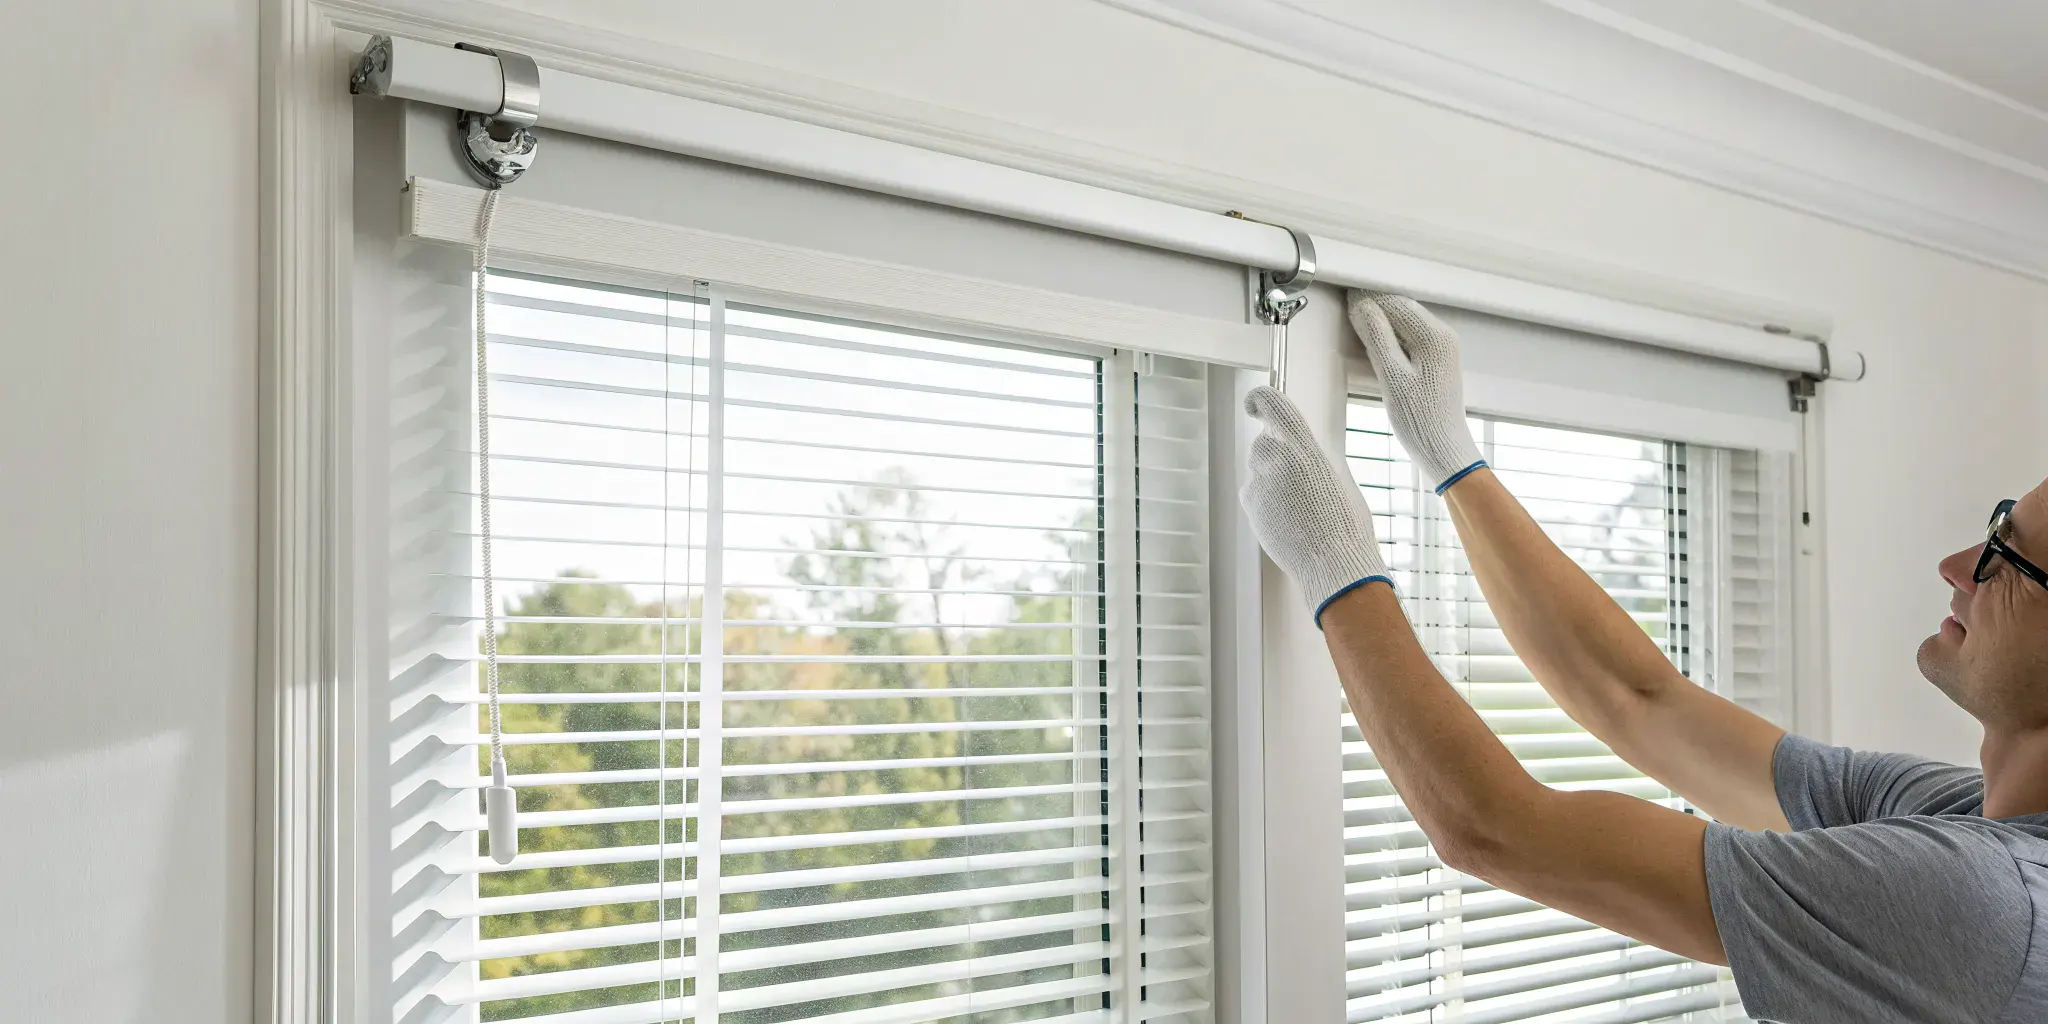
Install the Mounting Brackets
With your window prepped and your marks in place, it’s time for the most crucial part of the installation: mounting the brackets. This step sets the foundation for your new blinds, so taking your time here will pay off with a beautiful, professional-looking result. Getting the brackets secure and perfectly level ensures your blinds will hang straight and operate smoothly for years to come. Let’s walk through how to do it right.
Why You Should Pre-Drill Pilot Holes
Here’s a pro tip that will save you a ton of frustration: always pre-drill your screw holes. This small step makes a huge difference. Drilling small pilot holes before putting in the screws helps them go in much more easily, reducing the risk of stripping the screw head or cracking your window frame. It’s especially important for hardwood frames. This simple action ensures your brackets are securely attached without any damage, giving your faux wood blinds a sturdy base. Think of it as clearing a path for the screw to follow, making the whole process smoother.
Secure the Brackets and Ensure Alignment
Now, grab your brackets and hold them up to the marks you made earlier. Using a pencil, trace the screw holes onto the window frame. This gives you an exact guide for your pilot holes. Once you’ve drilled the pilot holes, position the bracket again and drive the screws in until they are snug and secure. Proper alignment is key, so double-check that each bracket is positioned correctly. If you’re feeling unsure, remember that our team offers expert mobile services throughout Orange, Riverside, and San Diego counties to handle the installation for you.
Use a Level to Get It Perfectly Straight
Before you fully tighten the last screw, place your level across the tops of the brackets to confirm they are perfectly even. Even a slight tilt can make your blinds look off-kilter. Adjust as needed until the bubble is centered, then finish tightening the screws. A level installation not only looks better but also helps your blinds function correctly, preventing uneven wear on the cords and mechanisms. Once your brackets are secure and level, you’re ready for the satisfying final step: hook the top of the blind into the brackets and rotate it back until you hear it snap firmly into place.
Mount Your 2-Inch Faux Wood Blinds
With your brackets securely in place, you’re ready for the most satisfying part of the project: hanging your new blinds. This is where your window transformation really takes shape. Don’t rush this step; taking a moment to get the headrail and valance attached correctly will ensure your blinds look and function perfectly for years to come. If you’re feeling a bit unsure, just follow these simple steps. And if you’re a homeowner in San Diego, Riverside, or Orange County and decide you’d rather have an expert take over, our mobile services team is always ready to help.
Attach the Side Covers First
Here’s a pro tip that will save you a lot of hassle: attach the side covers to the headrail before you hang the blinds. It might seem like a small detail, but trying to wrestle them on once the blinds are already mounted in the window frame is much more difficult. Attaching them now is quick and easy. This simple step ensures your faux wood blinds have a clean, polished, and professional look from every angle. It’s one of those little finishing touches that makes a big difference in the final appearance of your window treatments.
Snap the Headrail into the Brackets
Now it’s time to get the blinds into the brackets. Hold the headrail with the front facing you. Start by hooking the front lip of the headrail into the front of the mounting brackets. Once it’s resting securely, gently push the back of the headrail upward. You should feel and hear a distinct "snap" as it locks into the back of the brackets. This click confirms that your blinds are safely secured. Give it a gentle tug to make sure it’s firmly in place. This is the moment you can step back and see your vision coming to life.
Add the Finishing Touches: The Valance and Tilt Wand
You’re almost done! The final step is adding the decorative valance and the tilt wand. First, assemble the small corner pieces on your valance. Then, carefully line up the valance clips with the headrail and snap the valance into place. Be patient here, as it can sometimes take a little finesse to get the clips to catch perfectly. Once the valance is on, simply hook the tilt wand into its designated spot on the headrail mechanism. This allows you to easily open and close the slats to control the light. With that, your installation is complete.
Common Installation Mistakes to Avoid
Even the most seasoned DIY-er can run into a snag or two. When it comes to installing your new blinds, a few common missteps can turn a quick project into a frustrating afternoon. The good news is that these mistakes are easy to avoid once you know what to look for. Taking a moment to get these details right will save you time and ensure your blinds hang perfectly and function smoothly for years to come.
Think of this as your friendly guide to sidestepping the most frequent installation hiccups. From measuring correctly to snapping the headrail into place, we’ll cover the simple checks that make all the difference. A successful installation is all about patience and precision. Of course, if you’re in San Diego, Riverside, or Orange County and decide the DIY route isn’t for you, our team is always here to help with professional mobile services that bring the showroom and expert installation right to your door.
Inaccurate Measurements and Bracket Placement
The most critical errors often happen before you even open the box. An incorrect measurement can throw off the entire project, so it’s vital to get it right from the start. Always measure your window frame carefully before you purchase your faux wood blinds. When it’s time to install, precise bracket placement is just as important. A good rule of thumb is to measure two inches in from each side of the window opening to mark where your brackets will go. This ensures the blinds are perfectly centered and have the proper support, preventing sagging and ensuring smooth operation.
Skipping Pilot Holes or Other Prep Steps
It can be tempting to jump right into screwing the brackets into the wall, but skipping a small prep step can cause a big headache. Before you drive in the screws, take a moment to drill small pilot holes. This simple action does two very important things: it makes inserting the screws much easier, and more importantly, it helps prevent your wooden window frame from splitting. This is especially crucial for older homes or delicate wood finishes. Taking an extra minute for this step ensures a secure fit and protects your window frame from unnecessary damage, making for a much cleaner and more professional-looking installation.
Forcing the Blinds into the Brackets
You’re at the final step, and it’s exciting to see the finish line. In your haste, you might be tempted to force the headrail into the mounting brackets, but this can damage the blinds or the brackets themselves. There’s a specific technique that makes it easy and safe. First, hook the front part of the blind’s top rail into the front of the bracket. Then, gently push the back of the rail up until you hear a satisfying "snap" as it locks into place. Using force can lead to misalignment or a broken mechanism. Following the correct method ensures your new custom window coverings are secure and ready to use.
Test and Adjust Your New Blinds
You’re on the home stretch! With your blinds mounted, it’s time for the final, crucial step: testing and adjusting. Taking a few extra minutes here ensures your new window treatments not only look fantastic but also function perfectly for years to come. This is where you fine-tune the details for that polished, professional finish. Think of it as the quality control check that separates a good DIY job from a great one. A proper final check guarantees smooth operation and a perfectly level appearance, making all your hard work pay off. It helps you catch any minor issues, like a sticky cord or a slightly off-center headrail, before they become daily annoyances. After all, you want to enjoy the light control and privacy your new blinds offer without any hitches. Of course, if you’re in Riverside, San Diego, or Orange County and prefer to leave it to the experts, our mobile services team can handle the entire installation from start to finish, ensuring a flawless result every time. But if you’re ready to complete the job yourself, let’s walk through these last few checks to get your blinds looking and working their best.
Check That All Functions Work Smoothly
First, give your new faux wood blinds a test run. Gently raise and lower them completely using the lift cords. Do they move easily without catching or sticking? Next, use the tilt wand to open and close the slats. The movement should be fluid and consistent from top to bottom. Make sure the valance, which is the decorative top piece, is securely snapped into its clips. Sometimes these can be a bit tricky, so give it a gentle tug to double-check that it feels firmly attached. A secure valance and smooth operation are the first signs of a successful installation.
Make Final Centering and Leveling Tweaks
Now, step back and take a good look at your window. Do the blinds hang evenly? A simple but effective trick is to gently tap the headrail from side to side to ensure it’s perfectly centered in the window frame. This small adjustment makes a huge difference in the overall look, preventing uneven gaps on the sides. You can also place your level on the headrail one last time to confirm it’s perfectly straight. If it’s slightly off, you may need to slightly loosen and adjust the brackets. Achieving a perfectly centered and level set of blinds is key to getting that clean, custom-fit appearance you’re after.
Fine-Tune the Cords and Tilt Mechanism
Finally, let’s focus on the controls that you'll use every day. The tilt wand, which opens and closes the slats, should snap securely into its holder. You’ll often hear a distinct click when it’s properly in place, which confirms it's engaged. Test it again to make sure it rotates the slats smoothly without any resistance. Check that the lift cords are hanging freely and aren’t tangled behind the slats or wrapped around the wand. Ensuring these mechanisms are working correctly from day one prevents future frustration and keeps your blinds operating just as they should for the long haul.
Keep Your Faux Wood Blinds Looking New
One of the best things about faux wood blinds is how durable and low-maintenance they are. They’re built to handle the Southern California sun and everyday life in a busy home. With just a little bit of regular care, you can keep them looking as crisp and clean as the day we installed them. A simple cleaning schedule will prevent buildup, but we’ll also walk through what to do when they need a deeper clean. Taking these small steps will protect your investment and keep your windows looking fantastic for years to come.
Your Simple Cleaning Routine
The easiest way to keep your blinds looking great is to add them to your weekly dusting routine. You don’t need any special equipment; a microfiber cloth or a duster will do the trick. For an even quicker job, you can use the brush attachment on your vacuum. Simply close the slats and wipe or vacuum from side to side, then flip them the other way and repeat. This quick pass prevents dust, allergens, and grime from building up, which makes deep cleaning a much less frequent task. A few minutes each week is all it takes to maintain that fresh, clean look.
How to Handle Deep Cleaning
Every so often, especially for blinds in kitchens or bathrooms, you’ll want to do a more thorough cleaning. Start by closing the blinds and gently wiping each slat with a damp cloth. For most situations, warm water is all you need. If you come across a stubborn, greasy spot, a little bit of baking soda on your damp cloth can work wonders. After you’ve wiped them down, go over the blinds one more time with a cloth rinsed in clean water to remove any residue. This ensures a streak-free finish, leaving your blinds looking pristine and well-cared-for.
Long-Term Care for Lasting Beauty
To ensure your faux wood blinds have a long and beautiful life, it’s best to tackle any spills or splatters as soon as they happen. A quick wipe prevents stains from setting in. While high-quality faux wood is resistant to yellowing, years of direct, intense sunlight can sometimes cause discoloration. If this happens, you don’t necessarily need to replace them. A fresh coat of paint can restore their bright, clean appearance and give your room a quick refresh. Taking good care of your window treatments helps them remain a beautiful feature in your home, as you can see in our project gallery.