The thought of drilling into your walls or window frames can be nerve-wracking. What if you make a mistake? What if they end up crooked? These are common concerns, but you don’t have to let them stop you from enjoying your new shades. With a little guidance and a clear plan, you can achieve a flawless finish. We created this step-by-step guide to take the guesswork out of the cellular shades installation process. We’ll help you avoid common pitfalls and give you the pro tips you need to feel confident from start to finish, ensuring your new shades hang perfectly and operate smoothly.
Key Takeaways
- Get more than just a window covering: Cellular shades are a smart investment because their honeycomb design provides excellent insulation, reduces outside noise, and protects your home from damaging UV rays.
- Measure carefully for a perfect fit: The success of your installation hinges on accurate measurements. Always measure your window's width and height in three separate spots and use a level to ensure your mounting brackets are perfectly aligned.
- Handle with care and know your options: Keep your shades working smoothly with gentle operation and light cleaning. If you run into trouble or simply prefer an expert touch, professional installation is the best way to guarantee a perfect outcome.
Why Choose Cellular Shades?
If you're looking for window treatments that do more than just look good, cellular shades are a fantastic choice. They're one of the most versatile options available, offering a unique combination of style, insulation, and privacy. Their distinct honeycomb design is the key to their impressive performance, making them a smart and stylish addition to any home. Whether you're trying to keep your home comfortable year-round or protect your furniture from the California sun, these shades deliver. Let's look at what makes them such a popular pick for homeowners across San Diego, Orange, and Riverside counties.
How They Work
Cellular shades, sometimes called honeycomb shades, are made from fabric cells that form a unique honeycomb-shaped structure. This design creates pockets that trap air, forming an insulating barrier between your window and the room. This simple mechanism is what gives these shades their powerful insulating properties. When you raise them, they collapse neatly into a tight stack at the top of the window, giving you a clear, unobstructed view.
Save Energy and Insulate Your Home
That air-trapping honeycomb design does wonders for your home's energy efficiency. In the summer, it helps block solar heat from entering, keeping your home cooler and giving your AC a break. During cooler months, it prevents heat from escaping through the glass, helping you stay warm and cozy. This added insulation can make a real difference in your energy bills, which is a huge plus for any homeowner.
Block Sound and UV Rays
Beyond insulation, cellular shades offer other great perks. The same air pockets that block heat also help absorb sound, reducing outside noise from traffic or neighbors. This makes them a great option for bedrooms, nurseries, or home offices where you need a little extra quiet. They also provide excellent protection against harmful UV rays, blocking up to 99% of the radiation that can cause glare and fade your beautiful art and furniture over time.
Single Cell vs. Double Cell: Which Is Right for You?
Cellular shades come in two main styles: single cell and double cell. Single-cell shades have one layer of honeycomb pockets and offer great insulation for most situations. Double-cell shades feature two layers of pockets, providing maximum insulation and sound absorption. So, which one is right for you? If you live on a busy street or have a room that gets intense afternoon sun, a double-cell shade might be the perfect solution. If you're unsure, we can help you decide what works best for your space when you get in touch.
Gather Your Tools and Materials
A little prep goes a long way. Before you unbox your beautiful new shades, let’s get all your tools and materials in one place. Having everything within arm's reach will make the installation process feel like a breeze. It’s the secret to a smooth, stress-free project and a professional-looking result. This simple step ensures you can move from one task to the next without any interruptions.
Your Essential Tool Checklist
Ready to get started? Here’s a quick rundown of the basic tools you’ll want to have on hand. Most of these are probably already in your toolbox.
- Steel Tape Measure: For accurate measurements.
- Pencil: To mark where your brackets will go.
- Level: This is your best friend for avoiding a crooked installation that can affect how your shades operate.
- Power Drill and Drill Bits: For creating pilot holes, which makes installing screws much easier.
- Screwdriver: To secure the brackets firmly in place.
Gathering these items first will save you from making multiple trips to the garage and keep your focus on the project.
Hardware and Mounting Brackets You'll Need
Your new cellular shades will come with all the necessary hardware, including mounting brackets and screws. Before you begin, open the box and lay everything out to make sure it’s all there. The number of brackets you receive will depend on the width of your shades; wider shades need more support. For example, a shade under 40 inches wide typically needs two brackets, while wider ones may need three or more. The most important thing is to ensure all your brackets are installed perfectly level with one another. This guarantees your shades will hang straight and function smoothly for years to come.
Recommended Safety Gear
Safety first, always! While installing shades is a straightforward project, it’s smart to take a few precautions. We recommend wearing safety glasses, especially when you’re drilling, to protect your eyes from any dust or debris. If your windows are high, use a sturdy step stool or ladder and make sure it’s on solid, level ground. Once your shades are up, remember to operate them gently. Pulling too hard or forcing them can cause damage. If you ever feel unsure, our team offers professional mobile services in San Diego, Orange, and Riverside counties to handle the installation for you.
How to Measure Your Windows for a Perfect Fit
Getting the right measurements is the most important step for a flawless installation. A perfect fit ensures your cellular shades not only look fantastic but also function smoothly for years to come. Taking a few extra minutes to measure carefully will save you a lot of headaches later. Before you grab your tape measure, you’ll first need to decide between an inside or outside mount, as this choice determines how you measure. Let’s walk through how to get it right.
Deciding Between an Inside and Outside Mount
An inside mount fits your cellular shades neatly within the window frame for a clean, built-in look. This is a great option if you want to show off attractive window molding. For this style, install the brackets at the top of the window casing, about 1.5 to 2.5 inches in from each side. An outside mount hangs the shades on the wall above the window. This can make a window appear larger and is ideal for blocking more light or for windows with shallow frames. Center the shade above the window before marking your bracket positions.
A Step-by-Step Measuring Guide
Once you’ve chosen your mount style, it’s time to measure. Use a steel tape measure for accuracy.
- Width: For an inside mount, measure the width at the top, middle, and bottom of the frame and use the narrowest measurement. For an outside mount, measure the width you want the shade to cover, adding a few inches on each side for privacy.
- Height: For an inside mount, measure the height on the left, middle, and right sides, and use the longest measurement. For an outside mount, measure from where the headrail will sit to where you want the shade to end.
- Depth: For an inside mount, measure the frame’s depth to ensure it’s deep enough for the brackets.
How to Avoid Common Measuring Mistakes
A simple measuring error can lead to shades that don’t fit. A frequent mistake is taking only one measurement for width and height. Since frames aren't always perfectly square, measuring in three places accounts for any variations. Also, remember to check for obstructions like window cranks or locks that could block the shade’s operation. Don’t round your numbers; precision is key. If this process feels a bit daunting, remember you don’t have to do it alone. Our mobile services bring our showroom to you, and we offer professional measuring and installation throughout San Diego, Orange, and Riverside Counties to guarantee a perfect fit.
Your Step-by-Step Installation Guide
Alright, you’ve measured your windows and have your beautiful new cellular shades ready to go. Now for the fun part: installation. Don’t worry, this is more straightforward than it looks. With a little patience and the right approach, you’ll have your shades up in no time. We’ll walk through every step together, from preparing your space to making those final adjustments. Just follow this guide, and you’ll be enjoying the style and energy efficiency of your new shades before you know it. Let’s get started.
Step 1: Prep Your Workspace and Read the Instructions
Before you pick up a single tool, take a moment to get organized. Clear the area around your window to give yourself plenty of room to work. Unpack your new cellular shades and lay out all the parts and hardware on a soft cloth to prevent any scratches. Now, find the installation manual that came with your shades. I know it’s tempting to skip this, but please read it. Every brand is slightly different, and those instructions contain specific details for your product. Following them is the best way to ensure a smooth process and avoid any frustrating mistakes down the line.
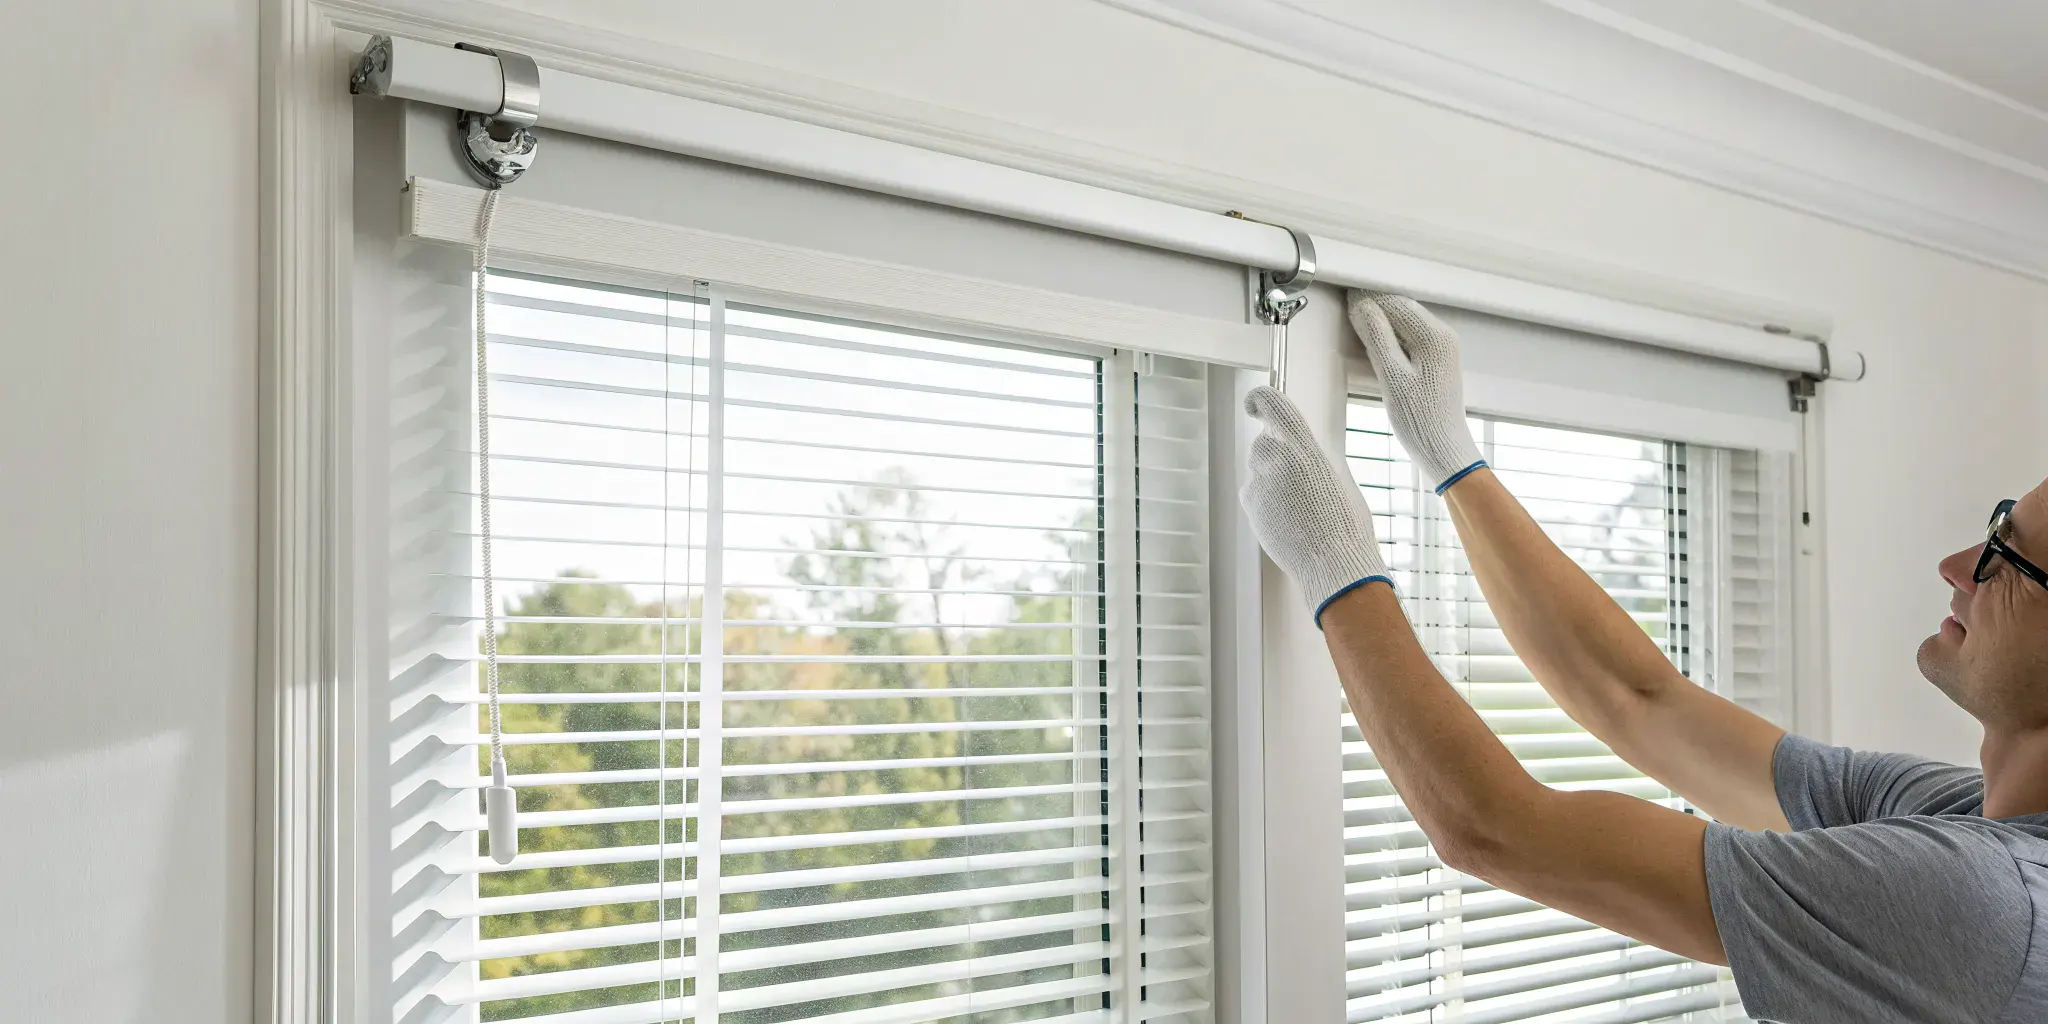
Step 2: Mark and Level Your Bracket Positions
Precision is your best friend in this step. Grab your tape measure and a pencil. Based on your manufacturer’s instructions, you’ll need to mark where your installation brackets will go. For an inside mount, you’ll mark the top of the window frame. For an outside mount, you’ll mark the wall or trim above the window. Once you’ve made your marks, use a level to draw a straight line connecting them. This guarantees your cellular shades will hang perfectly straight, not at a frustrating slant. Double-check your measurements before moving on to the next step.
Step 3: Drill Pilot Holes and Secure the Brackets
With your bracket positions marked, it’s time to drill. Drilling small pilot holes before you put in the screws makes the job much easier and prevents the wood from splitting. Use a drill bit that’s slightly smaller than the screw’s diameter. If you’re drilling into drywall where there isn’t a wooden stud, you’ll need to use drywall anchors to give the screws a secure grip. Once your pilot holes or anchors are ready, position the brackets over them and fasten them securely with the provided screws. Make sure they are firm, but don’t overtighten them just yet.
Step 4: Mount the Shades and Check the Fabric
This is where your window transformation really happens. Pick up the headrail (the top bar of your shades) and hook its front edge into the front of the brackets. Then, gently push the back of the headrail upwards until you hear a satisfying click. That sound means it’s locked securely in place. Before you do anything else, run your fingers along the top to make sure no fabric is pinched between the headrail and the brackets. This is a small but important check, as trapped fabric can prevent your shades from operating smoothly and could even cause damage over time.
Step 5: Test and Make Final Adjustments
Your shades are up, but you’re not quite done. Now it’s time for a test run. Gently lower and raise the shade several times. Does it move smoothly? Does it stay in place when you stop? If everything works perfectly, congratulations! If it feels a bit stiff or uneven, double-check that the headrail is fully snapped into all the brackets. You can also check your brackets with the level again to ensure nothing shifted. Once you’re happy with the operation, you can fully tighten the bracket screws. If you run into any trouble, remember our mobile services team is always here to help homeowners in San Diego, Orange, and Riverside counties.
How to Troubleshoot Common Installation Issues
Even with careful planning, you might run into a small snag during your installation. Don’t worry, it happens to the best of us. Most common issues are simple to fix with a few quick adjustments. Before you get frustrated, take a deep breath and walk through these common troubleshooting steps. A little patience and a clear head are your best tools for getting your new cellular shades to hang and operate perfectly. If you’ve tried these fixes and are still feeling stuck, remember that professional help is always an option.
Fixing Uneven Mounting and Misaligned Brackets
If your shade looks crooked after you’ve mounted it, the problem is almost always the brackets. An uneven shade not only looks off, but it can also cause operational issues down the line. The fix is straightforward: grab your level. Place it across the top of your brackets to check if they are perfectly aligned. If one is higher or lower than the other, you’ll need to adjust it. Simply unscrew the misaligned bracket, use your level and pencil to mark the correct position, and re-secure it. This small adjustment makes a huge difference in the final look and function of your window treatment.
What to Do if Your Shades Won't Raise or Lower Smoothly
A stubborn shade that sticks, stutters, or refuses to move smoothly can be frustrating. This issue often points back to the installation of the headrail or brackets. First, check that the headrail is snapped securely and evenly into all the mounting brackets. If it’s not sitting correctly, it can cause friction. Next, double-check that your brackets are perfectly aligned and not squeezing the headrail too tightly. A slight misalignment can prevent the internal mechanisms from working properly. Making sure your shades are installed level is the key to smooth, effortless operation every time you use them.
Solving Fabric Catching and Other Problems
Sometimes, the issue isn’t with the hardware but with the fabric itself. If your shade is having trouble moving, take a close look at the headrail. It’s possible for the cellular fabric to get caught between the headrail and the brackets during installation. This can prevent the shade from moving and may cause creasing or damage to the material over time. Gently check along the top of the shade and carefully free any fabric that might be pinched. Taking a moment to ensure the fabric is clear is a simple step that prevents future headaches.
How to Repair Damage from Forcing the Shade
When a shade isn’t cooperating, it can be tempting to give it a good tug. However, you should always operate your shades gently and avoid using excessive force. Forcing a stuck shade can damage the delicate internal cords, the fabric cells, or the headrail mechanism. This can turn a minor, fixable issue into a problem that requires a full replacement. If you’ve already forced it and caused damage, it’s best to stop and assess the situation. For significant repairs, it’s wise to contact a professional to avoid making the problem worse.
Keep Your New Cellular Shades Looking Great
Now that your beautiful cellular shades are installed, you’ll want to keep them looking as fresh as the day they went up. The good news is, it’s surprisingly simple. With just a little routine care, you can ensure your
Simple Cleaning and Dusting Tips
Dust is an inevitable part of any home, but it doesn’t have to settle on your new shades. For regular upkeep, lightly vacuum your cellular shades using a brush attachment. Just move gently from top to bottom to pick up any dust or debris caught in the cells. If you notice a small spot or stain, don’t worry. You can typically spot clean the area with a damp sponge and a tiny bit of mild soap. Gently dab the spot instead of rubbing to avoid damaging the fabric. This simple routine is usually all it takes to keep them looking pristine.
Preventive Care to Make Your Shades Last
Beyond cleaning, a little preventive care can make a huge difference in the lifespan of your cellular shades. The most important tip is to always operate them gently. Avoid yanking the cord or forcing a cordless shade up or down too quickly, as this can strain the internal mechanisms. It’s also critical to steer clear of harsh chemicals. Never use bleach or abrasive cleaners on the fabric, as these can cause discoloration and break down the material. Following these simple maintenance tips will help protect your investment and keep your window coverings functioning smoothly for years to come.
Prefer a Professional Touch? We're Here to Help in San Diego, Orange, and Riverside Counties
If you’ve read through the steps and feel a little hesitant about tackling the installation yourself, that’s completely understandable. While a DIY project can be satisfying, sometimes you just want the peace of mind that comes with a professional touch. Ensuring your new cellular shades have a perfect fit and operate smoothly is the most important part of the process, and handing the job over to an expert can save you time and potential frustration.
Hiring a professional installer means you can avoid common pitfalls like inaccurate measurements or accidental damage to your walls or window frames. Our team has the right tools and experience to get the job done efficiently and correctly the first time. You can see the flawless results of our work in our gallery. We handle every detail, so you can sit back and look forward to enjoying your beautiful new window coverings without the stress of a DIY project.
At Vineyard Blind & Shutter, we specialize in providing custom-fit window treatments for homes and businesses throughout San Diego, Orange, and Riverside Counties. Our mobile services bring the showroom directly to you, allowing us to take precise measurements and help you choose the perfect shades right in your own space. We are committed to ensuring every installation is seamless and meets our high standards for quality.
Why not let our team of experts take care of the details for you? If you’re ready for a flawless, professional installation, we invite you to contact us today. We’re happy to answer your questions and schedule a consultation to get your project started.